Exercise 1: Building a WRF domain over HKH region and including
dust in the WRF-Chem simulation.
- Before doing anything related to compiling and running the WRF-Chem
model, be sure you always set your environmental variables
(see the WRF-Chem quick start guide, step 1).
- cd to your working directory:
cd /home/${USER}
- You should already have a copy the WRF-Chem code in your home directory, but if it is lost you can obtain another by using the command
cp -R /home/${USER}/CODE/WRFV3 WRFV3
- You should also have a copy of the WRF WPS code to your home directory. If not, you can obtain another copy by using the command
cp -R /home/${USER}/CODE/WPS WPS
- Verify that the Dust Erosion data (erod directory) has been included
in your WPS GEOG data directory.
ls /atmosdata/tempgroupdata/inputDATA/GEOG
- In the WPS geogrid directory, link the GEOGRID.TBL.ARW_CHEM file to
your GEOGRID.TBL used by the WPS geogrid.exe executable.
- Using the WPS, build a single WRF domain with a Mercator (not Lambert Conformal!) projection
using geogrid.exe.
The simulation will will use 6 h GFS analysis data starting on 14 July 2010 and ending on 19 July 2010.
The example domain will be (41, 41) grid points in size and use 100 km
grid spacing, but you can use a slightly larger domain. Keep in mind that the entire class is sharing the computer so limit your domain to be no more than 81x81 with 50 km grid spacing.
Also, the example domain is centered at 25 degrees north and 90 degrees
east, but you can shift it a little. Be cautious about locating your doma as large mountains on a lateral boundary could result in some simulation issues.
Your namelist.wps should look similar to the example settings:

max_dom = 1,
start_date = '2010-07-14_00:00:00','2010-07-14_00:00:00',
end_date = '2010-07-19_00:00:00','2010-07-19_00:00:00',
interval_seconds = 21600,
io_form_geogrid = 2,
e_we = 41,
e_sn = 41,
geog_data_res = '10m',
dx = 100000,
dy = 100000,
map_proj = 'mercator',
ref_lat = 25.0,
ref_lon = 90.0,
truelat1 = 25.0,
truelat2 = 25.1,
stand_lon = 90.0,
If you are not certain of the settings, a sample namelist.wps is available to examine.
- Using the tutorial GFS data located in
/atmosdata/tempgroupdata/inputDATA/GFS_metfcst
use the WPS to build the "met_em" files for the exercise domain.
Don't remember the steps involved in running the WPS? Look at the sample WPS script for a reminder of the steps for running the WPS.
- Examine the geogrid.log file and verify that the fields EROD, sandfrac and clayfrac have been processed. There should be a message saying:
...
Processing field 24 of 28 (EROD)
Processing field 25 of 28 (CLAYFRAC)
Processing field 26 of 28 (SANDFRAC)
...
*** Successful completion of program geogrid.exe ***
And likewise for the metgrid.log file. There should be a message saying the EROD field has been read in and written to
file. If there is no EROD field processed messages in the log files then the GEOGRID.TBL is linked to the wrong file.
Link to the correct file as shown above an rerun the WPS.
- With the WRF WPS data for the exercise domain constructed, run real.exe to build the initial input and boundary
data files for a "dust only" (chem_opt=401) WRF simulation that runs
from 00 UTC 14 July to 00 UTC 19 July 2010. Modify the provided namelist.input file to work for your new domain and with
the chemistry options shown below.
chem_opt = 401,
dust_opt = 1,
These choices turn on the 5-bin dust only "chemistry" and restrict the emissions to just the
five (5) dust arrays. The addition of the dust arrays to a meteorology run is not computationally expensive and so
one should not expected a significant increase in run time compared to a meteorology-only simulation.
- The first step is to run real.exe and verify that the EROD array and the dust arrays are all in the wrfinput file. For serial
compiled code the command is:
real.exe
and for MPI compiled code the command is:
mpirun -np 1 real.exe
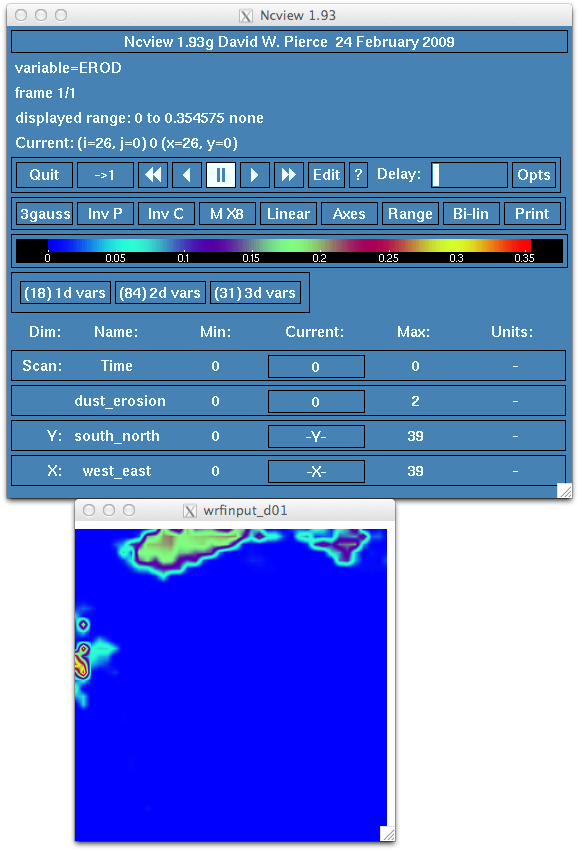
If the arrays exist and the EROD field appears correct, then one can run
wrf.exe and verify the simulation results. For serial compiled code the command is:
wrf.exe
and for code compiled with MPI the command is:
mpirun -np 8 wrf.exe
The dust fields should show the lofting, transport and dispersion
of aerosols.
Take care about selecting your time step if you use a grid spacing less than 100 km. What is the "rule of thumb" about grid spacing and meteorology time steps?
- Examine your results. You might want to compare your simulation results with the example solution.